Canoe Strokes Resource Document
Discover tips and tricks for teaching and assessing the various strokes paddlers use to propel and manoeuvre a canoe.
Introduction
This document outlines and provides tips for teaching the various strokes paddlers use to propel and manoeuvre a canoe. Any of these strokes can be used in either a lake or moving water environment. Some strokes will include an illustration and/or a YouTube link to assist with stroke reference.
This document is a living document that is reviewed based on submissions, recommendations, new illustrations, videos, or clarifications.
The Canoe Program Development Committee encourages all instructors to submit short videos (approximately 1–2 minutes) demonstrating a specific stroke. These videos should be a demonstration, without any verbal explanation, and the stroke must align with the written explanation in the document.
All video submissions will be reviewed for potential inclusion in this resource.
Progression of Stroke Development
The progression of learning canoe strokes typically moves from basic boat momentum to more refined techniques on body, boat control and finesse in steering, stroke blending, bracing, and efficiency over long distances or manoeuvring within complex water conditions in both tandem and solo paddling.
Each level introduces new strokes, which allow for the progression of skill and knowledge. There is flexibility to the instructor, based on their higher level of certification, to introduce strokes beyond those specifically listed within the Lake and Moving Water program levels, depending on the needs and safety of their clients.
Please note the following points about the listed canoe strokes in this document.
- Order of Presentation: The strokes are not listed in any particular sequence.
- Early Stages: Initial learning emphasizes boat movement over perfect paddler form.
- Learning Progression: Mastering stroke mechanics and paddler form is a continuous progression that requires practice beyond the scope of any single course.
- Advanced Skills: As proficiency increases, strokes can be blended to execute smooth and controlled manoeuvres.
- Competency: Stroke acquisition alone does not guarantee competent canoeing.
Stroke Names
We want to clarify that stroke names can vary by region. For instance, what is called a “Cut” in one area might be referred to as a “static draw” or “bow rudder” in another. The terminology used in this document is intended to establish a consistent language for all Paddle Canada programs nationwide.
Presenting Strokes to Your Participants
One of the quickest ways in presenting a stroke is by using the IDEAS Method. It quickly introduces the stroke through sight, followed by a brief explanation, and then empowers the participant to engage in self-discovery.
- Introduce the stroke. A sample is provided. Keep it short 1-2 sentences.
- Demonstrate the stroke. Engage visually without speaking. Demonstrate at least 3 times to allow the participants to visually see what you are doing and how the canoe is responding. Use only the visual sense at this time.
- Explain the stroke. Keep it short, using three to four key points through a breakdown of the demo.
- Action. Get the padders to “go and do it” by:
- letting participants go and practice,
- engaging with those that need more time for further explanation or questions,
- having an opportunity for handouts, written descriptions of strokes, and
- engagement in detection and correction of common errors.
- Summary is a review of the introduction in your own words. It can be as simple as repeating what the stroke does as in the introduction statement, or it can be presented as questions to the participants or as participant responses to the activity.
Teaching Concepts
The Paddler’s Box
To reduce shoulder injuries paddlers should be made aware of the “Paddler’s Box”. This is the rectangular shape the paddler creates between their arms, paddle and chest/shoulders. Whenever the paddler moves it is important to always have the upper body or torso rotate to move with the paddle to create the Paddlers Box. Paddlers should never move outside or beyond one’s field of vision from that box as it would increase the possibility of a shoulder injury.
How to Size a Paddle
Paddles come in a variety of shapes and sizes, designed for different uses and abilities. Sizing is based on the type of paddling, the paddler’s strength, build, and the size of canoe. When sizing, it is the shaft, not the blade, that holds the key to sizing. The most common method of sizing is done by holding the paddle’s grip and throat and placing the paddle shaft on the paddlers head. If the elbows form a 90° angle, then it is roughly the correct size, however blade length and type of paddling may change this. Key points: the paddle blade needs to be fully immersed, and the shaft hand should be above the gunwale when paddling. After that, it is a personal preference of comfort to hold and paddle with.
How to Hold a Paddle
The paddle is held by wrapping one’s fingers over the top of the grip with the thumb curled under the grip and with the other hand grasping the shaft, at least one to two hand spans from the throat, depending on the type of paddle. The shaft hand may need to “choke up” on the shaft depending on the stroke one is performing. For the majority of paddling the grip and shaft hands should have a more relaxed grasp on the paddle to reduce and allow for better blood flow to the hands.
Functional Movement and Torso Rotation
For solo canoes, the functional movement necessary for forward strokes is different from those used in tandem canoes. Tandem paddlers benefit from torso rotation while stroking on each side of the canoe. Solo paddlers build on their carving momentum using CAPT, where torso rotation is less likely to be necessary in a Class I environment.
Solo moving water canoes tend to be slower and lighter, so accelerate quickly, but attain a lower hull speed compared to tandem canoes. Because of these hull characteristics and the variable forward stroke movement encouraged by CAPT, torso rotation at the Introduction skill level may be unnecessary, in part because of the easy environment, and because it adds complexity to the movement.
Functional Movement will challenge paddlers by addressing torso rotation at the Intermediate skill level and full Kinetic Chain activation at the Advanced skill level.
Stroke Phases
There are generally five phases to a paddle stroke:
- Set up, when the paddler first positions their body and paddle to start their stroke.
- Catch, when the paddler moves the paddle blade into the water.
- Power, when the paddler moves the paddle blade or pulls the canoe towards the paddle blade to propel the canoe.
- Exit, when the paddler moves the paddle blade out of the water.
- Recovery, when the paddler moves the paddle to start the next stroke.
Feathering the Paddle Blade
To “feather” is a common term in the recovery phase after the blade exits the water. The blade is rotated flat/horizontal and sliced flat forward or backwards to reduce friction in the wind or waves.
Cadence
Cadence refers to the pace or the synchronization of strokes.
Understanding “Onside and Offside”
The onside and offside terms reference the side the paddler is paddling on. Onside and offside are usually referenced when paddling solo, however, they are also used in tandem paddling. For example, the bow person may be required to use an offside stroke like the Cross Bow draw.
Understanding “Inside and Outside Turns/Circles”
The terms inside or outside turns/circles are based on the stern paddlers paddling side. For example, if the stern paddler is on the right and carves to the right it is an inside turn/circle. If the stern paddler is on the right and carves to the left it is an outside turn/circle.
Understanding “Inside and Outside Tilt”
Inside Tilt: tilting the canoe towards the turn.
Outside Tilt: tilting the canoe away from the turn.
MITH For Tandem
Using MITH (Momentum, Initiate, Tilt and Hold), paddlers develop an understanding of the presence and use of bow pinning waves. These waves are used to guide the bow of the canoe throughout carving manoeuvres.
- Momentum- both bow and stern paddlers paddle forward to create sufficient momentum.
- Initiate the turn- the stern initiates the turn either left or right using stern initiation strokes.
- Tilt- both paddlers tilt the canoe towards the turn or arcing path.
- Hold the tilt- the tilt is held until the desired arc is completed.
CAPT for Solo
Introduction
When manoeuvring in and out of currents, solo canoes carve in arcing paths (for example, carving is the action, arcs are the resulting shape). The paddler controls the shape of these arcs by adjusting 4 key elements of the Forward or Cross Forward Stroke. These elements are stroke Cadence, Angle of the paddle shaft, Position of the paddle relative to the paddler, and Tilt. The acronym CAPT, as in “Captain your canoe”, refers to the skill of controlling the shape of the arc using Forward and Cross Forward Strokes.
Explanation
The arc can be thought of as a part of the imaginary circle that is travelled when carving the canoe. An arc can be described either as a tight arc, where it is part of a small circle, or a wide arc, where the circle is much larger. When performing manoeuvres in moving water, the shape of the arc is determined by the distance between the starting point and the canoe’s destination. A close target will require a tight arc, whereas a distant target will use a wide arc.
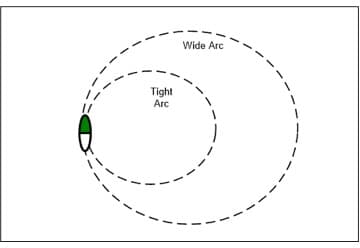
The shape of the arc can either be tight, wide or a variation in between.
Using the four elements of CAPT has a significant advantage over other methods of controlling arcs. CAPT relies exclusively on Forward and Cross-Forward strokes for control so no (or minimal) momentum is lost while steering the canoe. Valuable momentum is preserved while manoeuvring in rapids which is an asset for the solo paddler who cannot rely on the additional power of a tandem partner.
CAPT Carving Elements
Action: Tightens the inside circle
Action: Widens or changes carving direction

1. Stroke Cadence
Slower stroke.
Increased stroke rate.
2. Stroke Position
End stroke in front of your knee.
End stroke behind the knee, toward the hip.
3. Paddle Angle
Hold your paddle vertical.

Hold your paddle inclined over the canoe.
4. Canoe Tilt
Tilt the canoe.
Flatten the canoe prior to change of direction.
The shape of the arc is controlled by the four CAPT elements.
Summary
Controlling the shape of the arc can effectively be performed by only using Forward and Cross Forward strokes and the four elements of CAPT. Cadence, canoe shaft Angle, paddle Position and Tilt can be used individually or combined to provide powerful control of a carving arc while also maintaining canoe momentum.
Strokes
Stroke Legend
I – Pitch of the Blade
I I I – Power Phase
( P ) – Power Face of the Blade
( N P ) – Non-Power Face of the Blade

– Bow Paddler

– Stern Paddler
– Direction of Stroke
– Canoe Direction
– Front (green) of Canoe
Draw
Introduction
The Draw is used to move the canoe toward the paddler’s onside.
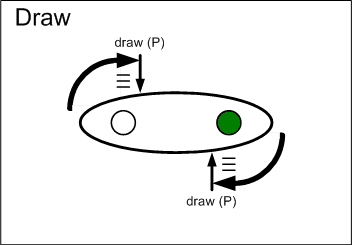
Explanation
- Rotate to face the paddle and reach out from the mid-thigh to fully immerse the blade, parallel to the canoe.
- Pull the canoe to the paddle.
Out of water recovery
- Drop the grip hand down (the paddle blade will slice out). Repeat if necessary.
In water recovery
- To recover, rotate the blade 90° (thumb pointing away from the canoe) and slice it back to the starting position. Repeat if necessary.
Action (detect and correct)
Error: The canoe moves forward or backward
Corrections: Ensure that the paddle moves at a right angle to the length of the canoe (keel line). Pull the canoe smoothly to the paddle until the shaft hand is by the hip.
Error: The canoe rolls or rocks side to side
Correction: Focus on cadence with their partner, together start slow and build the pace. For Solo paddlers, slow the pace down and then build to a comfortable rhythm.
Error: The paddle doesn’t have the reach.
Correction: Add more body rotation, “facing one’s work”, and extending the grip hand out over the water. Choke up on the shaft hand.
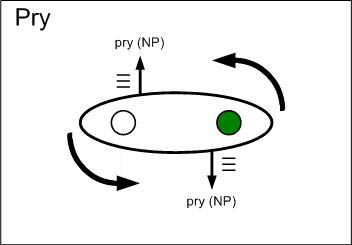
Pushaway and Pry
Introduction
The Pushaway and Pry strokes move the canoe away from the paddler’s onside.
Explanation for Push Away
- Set up: Rotate to face the paddle, with the paddle shaft horizontal and parallel with the gunwale, the blade, parallel to the keel line and perpendicular to the water, is sliced deep into the water from behind the hip, lifting the grip up so the paddle is vertical with hands stacked adjacent to the knee.
- Push the shaft hand away from the canoe keeping the grip hand in place.
- To recover, slice the blade back out of the water and back to the canoe by dropping the grip hand down towards the gunwale. Repeat if necessary.
Explanation for Pry
- Rotate to face the paddle, fully immerse the blade parallel to the canoe’s keel line and slice to the hull of the canoe where the hands are stacked adjacent to the knee.
- Pull the grip hand over the onside knee while the shaft hand rests on or just above the gunwale.
- To recover under water, rotate the blade 90° (thumb pointed away from the canoe) and slice the blade back through the water to the canoe while pushing the grip hand back over the shaft hand.
- Turn the blade back to its starting position to begin the next stroke.
Action (detect and correct)
Error: The canoe moves forward or backward.
Correction: Keep the blade parallel with the keel line & push the paddle directly out from the hip.
Error: The canoe rocks from side to side.
Correction: Slow down so the paddlers can become synchronized and then build to a consistent smooth pace/force. Shorten the stroke. Don’t lift the water. For the Pry stroke, initiate the stroke with the blade under the hull. The power phase must end as the grip hand comes over the onside knee.
Error: The grip hand is above the onside knee when starting the Pry.
Correction: Extend the upper arm so the grip hand is out over the water.
Error (Pry Stroke): The paddle shaft slides along the gunwale.
Correction: Hook the thumb of the shaft hand inboard over the gunwale.
Error: The grip hand moves.
Correction: Keep the upper arm close to the torso maintaining the grip hand as a fulcrum.
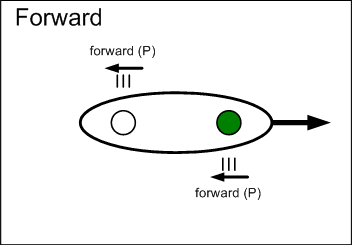
Forward
Introduction
To move the canoe forward and to offer stability.
Explanation
- Rotate the upper body away towards the paddler’s offside to extend the paddle towards the bow and fully immerse the blade.
- The shaft hand begins ahead of the grip hand, both over the water and the grip hand should be between chin and forehead with the grip arm elbow bent.
- Unwind as the shaft hand pulls back towards the onside knee and the grip arm straightens by extending forward.
- When the grip hand passes the shaft hand, lift the paddle from the water by lifting the shaft hand and lowering the grip hand then rotating the blade to slice/feather it through the air back to the start position.
Action (detect and correct)
Error: There is excessive boat bobbing and body movement.
Correction: Use less forward lean and more trunk rotation. Start slow and build to a consistent pace. Synchronize the strokes between paddlers using similar force.
Error: The paddler lifts water with the paddle at the end of the power phase.
Correction: End the stroke at the hip. Slice the paddle diagonally forward out of the water.
Reverse
Introduction
To propel the canoe backwards or decrease or stop forward momentum.
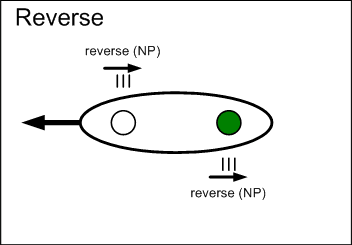
Explanation
- Rotate the body and slice the blade in behind the body next to the canoe.
- Place the shaft hand adjacent to the hip with the grip hand reaching across the body.
- Both hands are over the water alongside the gunwale.
- The paddle blade (non-power face) is pushed toward the knee where the blade is then sliced out from the water.
- The Advanced level can have the recovery slicing the blade back through the water to the start position.
Action (detect and correct)
Error: The wrist of the grip hand rolls into an open position so that the paddle is rotated the wrong way during the recovery phase.
Correction: Rotate the wrist so that the thumb points forward, away from the paddler. Arms are in a push up position.
Error: The paddle ‘pendulums’ through the power phase.
Correction: Use body rotation. Keep the grip and shaft hands close to the body. Take shorter strokes.
Error: Not enough momentum.
Correction: Stress body rotation for an extended reach.
Deep Brace / Drop Skeg
Introduction
This stroke is only for lake environments.
To offer canoe stability when stationary.
Explanation
- The paddle shaft is horizontal and parallel with the gunwale and the blade is parallel to the keel line and perpendicular to the water.
- Slice the blade deep in the water until the paddle shaft is vertical at the onside knee position and the grip hand is out over the water.
- The grip arm should be horizontal no higher than chest height.
- The shaft hand “locks” the shaft to the gunwale and the grip hand and arm is held rigid in place.
Action (detect and correct)
Error: The paddle blade is too close to the surface.
Correction: Submerge the blade deeper. Approximately 1/2 of paddle shaft out of the water.
Error: The canoe continues to rock excessively.
Correction: The paddle needs to be “locked” or held rigid in place. Blade or grip needs to be parallel to the keel line.
Sculling Low Brace
Introduction
The Sculling Low brace is a stroke that uses the paddle blade to add stability to the canoe. It can be seen as a temporary outrigger.
Sculling Low Brace and Drop Skeg
Explanation
- Rotate to the onside and choke up the shaft hand.
- Extend the paddle blade out vertically over the water with the grip hand low over the onside thigh.
- Sweep the blade back and forth ensuring the leading edge has a slightly raised pitch. Like spreading butter thinly on toast.
- Apply gentle and consistent force/pressure down on the shaft as the blade moves across the water.
Action (detect and correct)
Error: The blade is sinking in the water
Correction: Ensure the leading edge of the paddle blade is raised when sweeping. Ensure the paddle blade is extended (choke up). Ease up on the downward shaft pressure. Start slow.
Stern Pry
Introduction
The Stern Pry can be used to:
- counteract the tendency of the canoe turning away from the onside of a stern or solo paddler while maintaining forward momentum, or
- initiate a carving turn to the onside of the stern or solo paddler, or
- to initiate a turn to stop alongside a dock or shoreline.
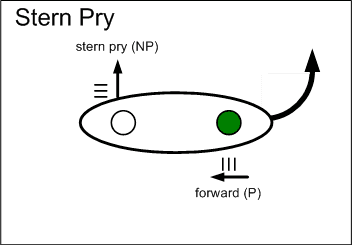
Explanation
- Fully immerse the blade by slicing the paddle blade alongside the canoe at the stern with the grip hand thumb up.
- The shaft hand is anchored behind the hip at the gunwale while the grip hand is extended beyond the gunwale adjacent to the onside knee, aided by facing the paddle. This positions the blade flat along the stern of the canoe.
- Pull the grip hand quickly inward to a position above the onside knee.
- The stroke uses the gunwale as a fulcrum.
- When landing alongside a dock/shore, raise the grip hand up to bring the blade forward, maintaining the same pitch to assist with stopping the forward momentum.
This stroke can be used after a forward stroke, blending the two strokes together.
Action (detect and correct)
Error: Zigzag travel line.
Correction: Have the stern paddler focus on two distant points (that are relatively close together) and then paddle between the two. Use the stroke more frequently, but less strenuously.
Error: Thumb bashing or pinching.
Correction: Ensure that the lower grip is well above the gunwale line, particularly during the ‘pry’ phase of the stroke.
Error: Nothing happens.
Correction: The paddler must feel resistance against the blade during the pry phase of the stroke, rather than allowing the blade to just slice through the water. Ensure the blade is fully immersed and the stroke starts as close as possible to the stern of the canoe. The blade is vertical and parallel to the canoe.
Error: Boat continues to turn toward stern paddler’s side
Correction: The stern pry stroke may not be necessary all the time. May need to alternate between forward strokes, stern draws, and the J.
Stern Draw
Introduction
The Stern Draw can be used by the stern person to
- counteract the tendency of the canoe turning towards the onside of a stern or solo paddler while maintaining forward momentum, or
- initiate a carving turn to the offside of the stern or solo paddler, or
- used to initiate a turn to stop alongside a dock or shoreline.
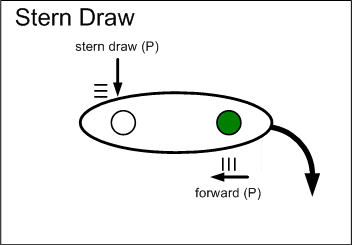
Explanation
- Rotate the body toward the paddlers onside and immerse the paddle blade into the water, 45° away from the stern of the canoe.
- The shaft hand is extended out and away from the hip with the grip hand over the water, adjacent with the onside knee.
- The shaft hand pulls the blade towards the stern of the canoe.
- To recover, slice the blade upward and out of the water and then forward to prepare for the next stroke.
Action (detect and correct)
Error: Nothing happens.
Correction: Ensure the blade is fully immersed and the stroke ends as close as possible to the stern of the canoe.
Error: Not enough reach.
Correction: Rotate the body more towards the onside.
Error: Not enough reach.
Correction: Shaft hand can choke up on the paddle.
Stern Rudder
Introduction
The Stern Rudder is used by the stern person to direct the bow of the canoe to point either left or right.
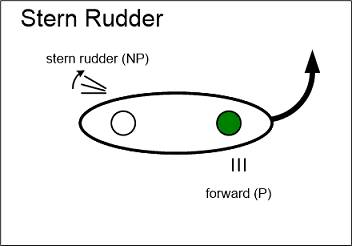

Explanation
- Rotate the body so both hands are just beyond the gunwale with the blade in the water parallel to the keel line.
- The shaft hand is placed behind the hip, and the grip hand is adjacent with the onside knee.
- To turn the canoe away from the paddler’s onside, move the grip outward by extending the grip arm, similar to a stern draw.
- To turn the canoe towards the paddler’s onside, move the grip inward no further than the onside knee, similar to a stern pry.
Action (detect and correct)
Error: Zigzag travel line.
Correction: Have the stern paddler focus on two distant points (that are relatively close together) and then paddle between the two. Use the stroke more frequently, but less strenuously.
Error: The canoe slows down.
Correction: Do not over steer (let the blade sweep out too far). Keep the paddle blade vertical throughout the stroke (do not change the pitch of the blade). Ensure body rotation.
“J” Stroke
Introduction
The J Stroke is used to counteract the tendency of the canoe to veer away from the stern or solo paddler’s onside.
Explanation
- Use a standard forward stroke grip and stance.
- Begin with a forward stroke then perform the correction phase.
- As the shaft hand reaches the hip, rotate the wrists so that the thumb of the grip hand points down and do a short, “quick” pry from the hull (as close to the canoe as possible) using the power face of the paddle.
- The paddle may be levered off the gunwale to provide extra force as necessary.
- Slice the blade out of the water to initiate another stroke.
Action (detect and correct)
Error: The canoeist is unable to maintain a straight course.
Correction: Carve the J as close to the canoe as possible. Do a short, quick pry as the shaft hand reaches the hip. Ensure that the blade is positioned aft of the canoeist and is immersed fully. Do not over steer.
Check that the paddle blade is vertical, so the blade is prying sideways rather than lifting water. Pause the paddle blade at the end of the pry to cause a greater steering effect. Do not lift or splash water.
Error: The upper arm is within the canoe.
Correction: Extend the grip hand farther out over the side of the canoe during the start of the stroke. Check that the paddle blade is vertical so that the stroke is applied closer to the canoe.
Error: The paddler cannot rotate the wrist due to physical limitations such as arthritis, carpal tunnel syndrome, or limited wrist or flexibility.
Correction: Rotate the grip in the hand so the blade follows through, but the grip hand thumb is pointed up.
Error: The grip hand rotates so that the thumb points up.
Correction: Relax the grip with the first finger resting on top of the grip with the thumb alongside it. Then have the finger point down to the water. There is less downward torque of the wrist.
Error: The hands are held too far apart so that the shaft hand is positioned at or below the gunwale.
Correction: Choke up.
Error: The paddle trails behind the canoeist in an exaggerated and inefficient push away.
Correction: Use upper body rotation ensuring that the grip hand is in front of the body and the shaft hand is at the hip. Then, with the blade positioned slightly aft of the torso, do a short, quick push away.
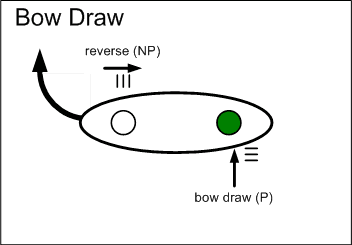
Bow Draw
Introduction
The Bow Draw, in the Lake program, is used when performing reverse straight lines. Within the Moving Water program, it is used in a back ferry or descending back ferry manoeuvre. It turns the bow of the canoe to the bow paddler’s onside.
Bow Draw (pivot and reverse line corrections) (0:57 to 1:22)
Bow Draw: Moving Water Backferry
Explanation
- Turn the grip thumb downward and slice the blade forward and 45° away from the bow with the grip hand at the midline.
- Extend the grip hand across the gunwale away from the canoe, using the shaft hand as a fulcrum, so that the paddle blade pushes water beneath the bow.
- To recover, lift the blade from the water and prepare for the next stroke.
Action (detect and correct)
Error: Slow to turn.
Correction: Add more body rotation to extend the reach. The grip hand should be out over the water. Ensure the blade is fully immersed. Position the paddle in a more vertical position and forward.
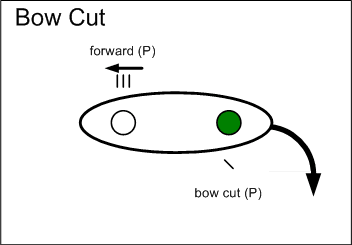
Bow Cut
Introduction
This stroke turns the canoe with forward momentum to the bow or solo paddler’s onside.
Explanation
- Rotate the body and place the paddle vertically adjacent to the onside knee with hands stacked and over the water. The bow or solo paddler may use a slight forward lean to extend forward to the bow.
- The blade is fully immersed in the water with the leading edge rotated so the leading edge is angled 20° to 45° depending on how much the paddler wishes to tighten the turn or arc.
- Hold the paddle at the angle until the canoe begins to lose momentum.
Action (detect and correct)
Error: Slow to turn.
Correction: Add more body rotation to extend the reach. The grip hand should be out over the water. Ensure the blade is fully immersed. Position the paddle in a more vertical position and forward. Open up the angle more.
Error: Canoe stalls or loses momentum.
Correction: Reduce the blade angle/pitch.
Stern Cut
Introduction
The Stern Cut turns the canoe away from the stern paddler’s onside (towards the bow paddler’s onside). This is used within the Lake program when docking, the Big Canoe program on a gentle carve or in both Lake and Moving Water programs when sideslipping.
Stern Cut on a sideslip 0:12 – 0:20
Explanation
- Rotate the body to allow the grip hand to extend out over the water and slightly raise the shaft hand.
- Fully immerse the blade at approximately a 30° angle, slightly forward of the hip
- Hold the paddle at this angle until the canoe begins to lose momentum or the desired destination is achieved.
- Finish with either a draw or slicing forward to initiate the next stroke.
Action (detect and correct)
Error: Turning action is insufficient
Correction: Ensure good forward speed. Check both the angle or pitch of the paddle blade to the canoe.
Error: Canoe stalls or loses momentum.
Correction: Reduce the blade angle/pitch.
Bow and Stern Jam
Introduction
With momentum, the Jam stroke will shift the canoe sideways away from the paddler’s onside. The Cut is the complementary stroke for the paddler’s partner to use to shift the canoe sideways. The Cross Bow Cut can be used instead of the Bow Jam.
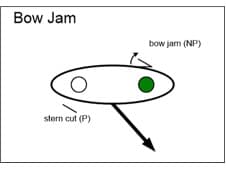
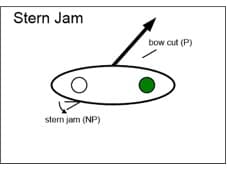
Explanation
- Slice the paddle from behind into a vertical position next to the onside knee with the power face against the hull as the grip hand is out over the water.
- The trailing edge of the paddle blade is rotated between 0° to 45°, from the hull, by twisting the grip thumb outward.
- The degree of twist depends on how quickly the paddler wishes to move sideways.
- As the sideway momentum decreases, drop the grip hand and slice the paddle blade out of the water to initiate the next stroke.
Ensure the shaft hand is above the gunwale to prevent digits from being pinched/crushed.
Encourage communication between bow and stern paddlers as the stern paddler will need a verbal cue to be alerted of the shift.
Action (detect and correct)
Error: Canoe tips over.
Correction: Stress communication and brace for the “pull” on the Jam stroke. Lean, with proper weight transfer, when applying the Jam stroke.
Error: Paddle is pulled out of upper grip hand.
Correction: Stress importance of a firm grip before the blade is planted in the water. Ensure the shaft hand continues to hold the paddle, so it is not lost.
Error: Little or no turning effect or the boat turns in the opposite direction.
Correction: Check the pitch of the blade, which should follow the contour of the side of the boat, near the front. The grip hand should be out over the water, so the shaft is angled towards the underside of the boat in order for the stroke to work.
Error: Canoe stalls or loses momentum.
Correction: Reduce the blade angle/pitch.
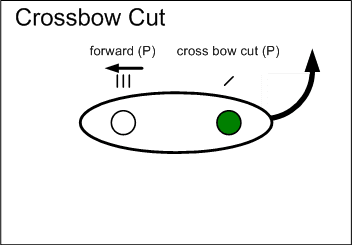
Cross Bow Cut
Introduction
The Cross Bow Cut is used to tighten the arc of the canoe towards the bow paddler’s offside. It can also be used to assist with docking manoeuvres and running sideslips.
Explanation
- Bow paddler rotates to their offside without switching hands on the paddle.
- Immerse the paddle blade vertically adjacent to the offside knee with hands stacked.
- The blade is angled by pointing the grip thumb towards the paddler.
- The degree of rotation depends on how much the paddler wishes to tighten the arc. The range of rotation is 0° to 45° with respect to the leading edge of the blade.
Action (detect and correct)
Error: Turning action is incomplete.
Correction: Use good forward speed. Initiate the manoeuvre with a strong stern turning stroke. Adjust the pitch so that the blade catches more water.
Error: Canoe stalls or loses momentum.
Correction: Reduce the blade angle/pitch.
Cross Bow Draw
Introduction
The Cross Bow Draw is used to tighten the arc of the canoe to the bow paddler’s offside. It can also be used to assist with docking and pivot turns.
Explanation
- Place the paddle vertically adjacent to the offside knee with hands stacked.
- The blade is rotated by twisting the grip thumb away from the paddler.
- The degree of rotation depends on how much the paddler wishes to tighten the arc.
- The range of rotation is 0° to 45° with respect to the leading edge of the blade.
Action (detect and correct)
Error: Turning action is incomplete.
Correction: Use good forward speed. Initiate the manoeuvre with a strong stern turning stroke. Adjust the pitch so that the blade catches more water.
Error: Canoe stalls or loses momentum.
Correction: Reduce the blade angle/pitch.
Cross Bow Jam
Introduction
This stroke turns the canoe sharply towards the paddler’s onside. It is a dynamic stroke in that it requires the paddler to do a strong J Tilt away from the stroke. It may be followed by additional offside pry strokes or draws.
Explanation
- Rotate the torso to the offside and do not switch hand positions.
- As the paddle is brought across the bow, choke up on the shaft of the paddle.
- Slice the blade into the water, parallel and next to the hull of the canoe. Ensure both hands are stacked and over the water.
- With the leading edge against the hull, angle the back edge paddle blade out. Adjust the pitch so that the back face is angled forward at about 30° to 45°.
Ensure the shaft hand is above the gunwale to prevent digits from being pinched/crushed.
Action (detect and correct)
Error: Turning is incomplete.
Correction: Increase momentum. Initiate the manoeuvre with a strong turning stroke. Adjust the pitch so the blade catches more water. Extend the blade as far forward as possible while maintaining the correct stance. Use a J Tilt to centre body weight within the canoe.
Error: Canoe stalls or loses momentum.
Correction: Reduce the blade angle/pitch.
Sculling Draw
Introduction
The Sculling Draw moves the canoe towards the paddler’s onside.
Explanation
Rotate to face the paddle and reach out from the mid-thigh to fully immerse the blade, parallel to the canoe’s keel line.
- Rotate and fully immerse the blade. The shaft should be held close to vertical at the hip and extended out from the canoe.
- Angle (20° to 45°) the leading edge of the blade, away from the canoe as the blade is sculled forward and backward parallel to the keel line.
- Roll the wrists to adjust the blade pitch.
- With the grip hand acting as a fulcrum, maintain equal pressure and distance from the hip, both forward and backward, on the paddle blade with the shaft hand.
Action (detect and correct)
Error: The hands are held too high.
Correction: Lower the paddle so the blade is fully immersed. Position the grip hand about shoulder level.
Error: The drawing action of the scull is weak.
Correction: Check the pitch of the blade. Increase the angle of the path of the stroke. Apply slightly more force.
Error: Canoe moving forward or backwards.
Correction: Ensure the pitch of the blade is at the same angle with the same force going forward and backwards.
Error: Paddler has trouble learning the stroke.
Correction: Have the paddler start off doing the Sculling Low Brace and continue doing it while slowly raising the grip hand and slowly bringing the shaft hand closer to the canoe.
Sculling Pry
Introduction
The Sculling Pry moves the canoe away from the paddler’s onside.
Explanation
- Fully immerse the blade. The shaft should be held close to vertical at the hip and close to the gunwale.
- ‘Slice’ the paddle forward and backward generally in a line parallel to the keel.
- With the grip hand acting as a fulcrum, apply a steady force by pushing out with the shaft hand.
- Roll the wrists to adjust the blade pitch. Angle the leading edge of the blade 20° to 45° toward the canoe.
Action (detect and correct)
Error: The hands are held too high or away from the torso.
Correction: Pull arms in toward the torso. Position the grip hand about shoulder level. The paddle can slide along the gunwale.
Error: Sculling motion is inefficient.
Correction: Increase the pitch of the leading edge of the blade to between. Increase the force on the paddle blade with the shaft hand.
Error: Canoe moving forward or backwards.
Correction: Ensure the pitch of the blade is at the same angle with the same force going forward and backwards.
Error: Paddler has trouble learning the stroke.
Correction: Have the paddler perform the Sculling Draw, then ask them to stop and slowly perform the same stroke actions in reverse.
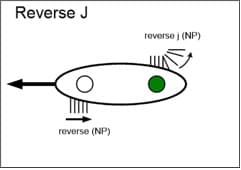
Reverse J
Introduction
To provide directional control from the bow or solo when back paddling. The strokes also provides momentum while moving the bow away from the bow paddler’s onside during a Back Ferry.
Reverse J and Bow Draw on a Backferry
Explanation
- A standard reverse stroke is used.
- At the end of the power phase, the grip thumb is pointed back and down towards the water.
- With the blade parallel to the keel line the paddler then pushes the lower hand out and away from the canoe. The gunwale can be used as a fulcrum.
- Fine-tuning adjustments can be made either by pushing the blade out farther or by drawing in (Bow Draw) prior to recovery.
For the first few attempts, have the stern paddler rest as the bow paddler concentrates on the mechanics of the stroke. For Lake program participants, encourage the bow paddler to focus on a single point on shore.
Action (detect and correct)
Error: Ineffective turning component.
Correction: Ensure the blade is rotated fully and parallel to the keel line when pushed away from the canoe.
Error: Ineffective propulsive component.
Correction: Stress the importance of rotating the torso. Check the blade is flat and horizontal during the reverse stroke.
Bow J
Introduction
The Bow J turns the canoe away from the paddling side of the bow paddler. It is commonly used to assist with carving a turn or circle.
Explanation
- Rotate the torso to start the forward stroke. With a nearly vertical paddle and fully immersed blade in front of the onside knee
- As the hip reaches the shaft hand, rotate the grip hand thumb down, and initiate a short, quick pry or push away from the canoe. Note that the pry is executed at the hip and the paddler can pry off the gunwale.
- Slice the blade out of the water to initiate another stroke.
Action (detect and correction)
Error: The upper arm is overextended.
Correction: Bend at the elbow. Position the arm so that the grip hand is about shoulder height.
Error: The grip hand is positioned too close to the torso.
Correction: Extend the grip hand further out over the side of the canoe during the first part of the power phase. Check that the paddle is vertical so that the stroke is applied closer to the keel line.
Error: The grip hand rotates so that the thumb points up.
Correction: Flex the wrist so that the thumb of the grip hand rotates away from the body.
Error: The hands are held too far apart so that the shaft hand is positioned at or below the gunwale.
Correction: Choke up.
Error: The paddle trails behind the canoeist in an exaggerated and inefficient push away.
Correction: Do a short, quick push away. Use upper body rotation ensuring that the grip hand is in front of the body and the shaft hand is at the hip.
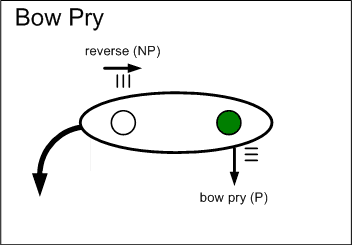
Bow Pry
Introduction
The Bow Pry is used within the Moving Water program to move the bow away from the bow paddler’s onside during a descending back ferry.
Explanation
- Slice the blade forward beside the canoe with the grip thumb rotated backward and down.
- Allow the paddle shaft to slide through a loosened shaft hand toward the bow (like a pool cue) which positions the blade flat against the bow of the canoe.
- Use the gunwale as a fulcrum and pull the grip hand towards the paddler’s mid-line.
- To recover, lift the blade from the water and begin the next stroke.
Action (detect and correct)
Error: The bow of the canoe is not moving away from the bow paddler’s onside or is slow to respond to the correction.
Corrections: Ensure that the blade is positioned ahead of the paddler, alongside the canoe, is immersed fully, and is kept vertical to the water surface.
Error: Canoe turns rather than adjusting to keep on course.
Correction: Do not over steer. Shorten the Bow Pry stroke.
Forward Sweep
Introduction
The Forward Sweep turns the canoe away from the paddler’s onside and is only done by one paddler.
Explanation
- Place the grip hand firmly on the grip in a standard forward stroke position. Slide the shaft hand 10 to 15 cm up the shaft to extend the reach (aka “choke up”); the wider the sweep of the arc, the greater the turning effect.
- Tandem paddlers trace an arc of 90°, a solo paddler can trace an arc up to 180° depending on the desired destination.
Bow Paddler
- Rotate the torso away from the paddler’s onside.
- With the paddle nearly horizontal, fully immerse the blade at the bow of the canoe, flat against the bow hull, vertical to the water surface. Position the grip hand at waist height with the thumb pointing up.
- As the upper body unwinds, push the grip hand out slightly from the waist and swing the shaft hand in a wide arc until the lower arm extends out from the hip. The power phase ends at the hip (TIP to HIP) with the paddle at right angles to the length of the canoe.
- Slice the blade up out of the water then rotate and feather it forward by lifting and turning the shaft hand and dropping the grip hand. The thumb of the grip hand points forward.
Stern Paddler
- Extend the nearly horizontal paddle at right angles to the length of the canoe and with the blade vertical to the surface of the water. Fully immerse the blade keeping the grip hand at waist height with the thumb pointing up.
- Rotate the torso as the paddler’s shaft hand traces out a wide arc and the grip hand acts as the fulcrum, remaining above the onside gunwale.
- When the blade almost touches the stern (HIP to TIP), slide the blade up out of the water, turn and feather it diagonally forward by lifting and turning the shaft hand. The thumb of the grip hand points forward.
Solo Paddler
- Rotate the torso away from the paddler’s onside.
- With the paddle nearly horizontal, fully immerse the blade toward the bow of the canoe flat against the bow hull, vertical to the water surface. Position the grip hand at waist height, above the gunwale, with the thumb pointing up.
- Lean back slightly as the upper body rotates. With the grip hand acting as the fulcrum and remaining above the onside gunwale, swing the shaft hand in a wide arc. (TIP to TIP)
- When the blade almost touches the stern, slice the blade up out of the water then feather it diagonally forward by lifting the shaft hand. The thumb of the grip hand points forward.
Action (detect and correct)
Error: Canoe is not turning
Correction: Ensure the shaft hand is raised (choked up) 10 to 15 cm up the shaft for an extended reach. Fully immerse the paddle blade and the blade is vertical to the surface of the water throughout the stroke.
Reverse Sweep
Introduction
The Reverse Sweep is used by a stern paddler or solo paddler to turn the canoe to the paddler’s onside when docking under momentum or when pivoting the canoe.
Explanation
- Place the top hand firmly on the grip in a standard forward stroke position. Lift or choke up the lower hand 10 to 15 cm, to extend the reach.
- The paddle traces an arc of 90° or up to 180 ° for the solo paddler. The back face or non-power face of the blade is used.
- Drop the grip hand slightly while raising the shaft hand (choking up) to lift the paddle out of the water.
Stern Paddler
- Rotate the torso toward the paddler’s onside.
- With the paddle nearly horizontal, fully immerse the blade in the water flat against the canoe hull, at the stern of the canoe. Position the grip hand at waist height, over the gunwale, with the thumb pointing up.
- As the upper body unwinds, swing the shaft hand forward in a wide arc, extending out from the hip at right angles to the keel line, while the grip hand is stationary at the hip.
- Slice the paddle up and out of the water.
Solo Paddler
- Rotate the torso toward the paddler’s onside.
- With the paddle nearly horizontal, fully immerse the blade in the water flat against the canoe hull, at the stern of the canoe. Position the grip hand at waist height, over the gunwale, with the thumb pointing up.
- As the upper body unwinds, swing the shaft hand forward in a wide arc, continuing until the blade reaches the hull near the bow of the canoe or when the desired destination is achieved.
- Slice the paddle up and out of the water.
Action (detect and correct)
Error: Canoe slow to move/turn or not turning.
Correction: Ensure the paddle blade is fully immersed and vertical to the surface of the water. Ensure the paddle blade starts at the very back/stern of the canoe (TIP TO HIP). Solo paddler (TIP TO TIP). The paddle blade is fully immersed. Torso rotation for reach. The shaft hand is raised up the shaft (choked up).
Low Brace
Introduction
To return a capsizing canoe to the upright position. The stroke utilizes the water resistance against the paddle blade as the canoe is capsizing towards the paddler’s onside. The complement stroke for the paddling partner is the Righting Pry.
Explanation
- Place the paddle horizontally and perpendicular to the gunwale with the power face pointing up.
- Knuckles of both hands are down in a “push up” position with the shaft hand raised, choked up on the paddle, over the water, and the grip hand positioned low and close to the onside knee.
- Push the non-power face down on the water while swinging the lowered head and shoulders across from the onside to the off-side, pulling the paddle inward across the boat
- Once stabilized, sit up and continue paddling for continued stability.
Action (detect and correct)
Error: Tip of blade hitting the water first.
Correction: Tilt the canoe over more and to ensure the grip hand knuckles wet first to allow for the full and flat paddle blade to “slap” the water.
Error: Body position is stiff and upright in the canoe.
Correction: Emphasize body rotation to initiate the stroke; head and shoulders are low and stay low as the body travels towards the offside gunwale.
Error: Using the power face of the paddle blade.
Correction: Ensure the non-power face of the paddle blade is used to ensure the most efficient levelage.
Righting Pry
Introduction
To return a capsizing canoe to the upright position. The stroke utilizes water resistance against the paddle blade as the canoe is capsizing to the paddler’s offside. The complement stroke for the paddling partner is the Low Brace.
Righting Pry stern saves the capsize
Explanation
- Slice the paddle blade forward from behind so it is fully immersed and parallel to the keel line.
- The grip hand is out over the water, grip thumb is facing the paddler, and the shaft hand is choked up and above the gunwale.
- Pull the grip hand down towards the outside thigh. The paddle shaft is pried on the gunwale. The blade lifts the water and pushes the gunwale down to level out the canoe.
- Once stabilized continue paddling for continued stability.
Ensure the shaft hand is above the gunwale to prevent digits from being pinched/crushed.
Action (detect and correct)
Error: Canoe capsizes to the offside.
Correction: Ensure the paddle blade is deep, fully immersed, and parallel to the canoe. Pull down fast and with force to lift the water and push down the gunwale. Rotate the torso. When paddling tandem this requires coordination with the paddling partner’s corrective stroke.
Error: Canoe tips to the onside.
Correction: Ensure the correcting force on the paddle is decreased as the canoe is righted.
Canadian
Introduction
The Canadian Stroke counteracts the veering away from the paddling side of a solo or stern paddler. The correction or power phase happens within the recovery phase of the stroke.
Explanation
- Use a standard forward stroke grip and stance, and as the shaft hand reaches the hip, rotate the grip hand so the thumb is rotated forward, down and away from the body.
- As the paddler unwinds the torso, the paddle blade’s leading edge, slightly lowered, is sliced forward underwater.Some pressure will be felt on the power face of the blade. The paddle blade may be positioned out away from the canoe, especially for solo paddlers who are sitting or kneeling down low in the bilge.
- When the paddle blade reaches the hip, elevate the leading edge of the blade by rotating the wrist so the thumb of the grip hand points up then slice the blade up out of the water.
- Bring the paddle forward to prepare for the next stroke.
Action (detect and correct)
Error: Unable to maintain the desired line of travel.
Correction: Do a short, quick pry as the shaft hand reaches the hip. Ensure the blade is positioned aft of the paddler and remains immersed in the water. Lower the grip hand and pull up with the shaft hand to initiate the recovery phase. Do not over steer. Do not lift or splash water.
Error: The upper arm is overextended during the propulsion phase.
Correction: Bend at the elbow. Position the arm so that the grip hand is about shoulder height.
Error: The grip hand is positioned too close to the torso.
Correction: Extend the grip hand farther out over the side of the canoe during the first part of the power phase. Check that the paddle is vertical so that the stroke is applied closer to the keel line.
Error: The grip hand rotates so that the thumb points up.
Correction: Flex the wrist so that the thumb of the grip hand rotates forward, downward away from the body.
Error: The hands are held too far apart so that the shaft hand is positioned below the gunwale.
Correction: Raise the shaft hand (choke up).
Error: The paddle is too vertical during the recovery phase.
Correction: Lower the grip hand bringing the paddle closer to horizontal. Especially important for solo paddlers sitting/kneeling low in the canoe.
Error: The canoe loses forward momentum.
Correction: Decrease the amount of correction. Avoid pushing back on the water with the power face of the blade.
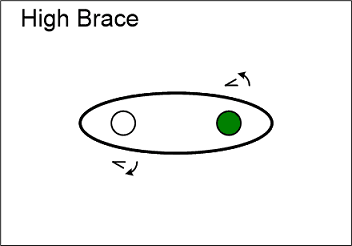
High Brace
Introduction
The High Brace is used to maintain stability while moving forward and descending wavey or boiling currents. The High Brace uses the resistance of the water against the blade to steady the paddler.
Explanation
- Reach the paddle out beside the canoe inline with the knee position
- The shaft hand elbow is tucked close to the paddler’s side; the grip hand is in front and close to the collar bone.
- The power face begins parallel to the canoe and resistance is controlled by gently twisting the leading edge of the blade outwards from the hull.
Action
The paddlers will use the high brace to maintain boat and paddler stability.
Compound Reverse
Introduction
The Compound Reverse stroke is used for reverse paddling when more precise directional control or more power is required.
Explanation
- Using the standard forward stroke grip, the paddler will rotate and lean back towards the stern, with the blade power face facing to the front.
- Fully immerse the paddle blade into the water perpendicular to the keel line, thumb of the top hand pointing towards the canoe.
- Pull the paddle forward through the water until the shaft is opposite the hip.
- Then rotate the grip and shaft hand at the hip so the non-power face is completing a Reverse stroke for the stern paddler or Reverse J stroke for the bow or solo paddler starting at the hip.
- Slice the blade out of the water to the side to repeat or start a new stroke.
Action (detect and correct)
Error: Insufficient trunk rotation; insufficient back lean.
Correction: Exercises involving upper body rotation while hips and legs remain stationary will help, as will upper body flexibility exercises. Rotating in a kneeling position to face the paddler’s onside may also help.
Error: Not rotating the paddle blade at the hip.
Correction: Have the paddler lift the paddle clear of the water and practice the twisting action a few times. Have the paddler stall the power phase very briefly as the blade is rotated. Lean farther back for the catch. Reach top hand farther back for the catch. Shorten strokes.
Error: Arms doing all the work.
Correction: Stress body rotation and back lean.
Silent
Introduction
This stroke may be used for the following: silently counteracts the canoe veering away from the stern or solo paddler’s offside, helps maintain canoe course and stability in wind, waves, and current, and finally when there is no room to perform paddle recovery out of water.
Explanation
- At the end of the forward stroke, loosen the grip and shaft hand.
- The grip hand rotates the paddle grip in the palm of the hand so the paddle can be sliced forward to start the next stroke.
- As the blade is sliced forward and still in the water, lift the grip hand up and the shaft hand forward so the paddle blade remains vertical and the shaft is above the water.
- The correction happens in a variety of ways. A slight pry at the end of the forward stroke or a slight draw at the end of the recovery through the water.
- To start the next Forward Stroke, rotate the grip again in the palm of the hand so the non-power face becomes the power face.
Action (detect and correct)
Error: Unable to maintain the desired line of travel.
Correction: Apply a stronger pry at the end of the Forward stroke. Adjust the pitch of the blade while slicing forward in the water if additional steering is needed in wind, waves or current.
Error: Not rotating the blade in the palm of the hand
Correction: Ensure the hand grips are loose on the paddle. Apply a coloured tape along one side of the paddle blade or grip to show the rotation of the paddle within the hands during the learning process. Slow the steps down and gradually increase the speed they are done as they are learned.
Error: Noisy (splashing water) when sliced forward.
Correction: Slow down and raise the paddle blade higher in the water so just the top of the blade, the narrowest part of the paddle, is slicing through the water.
Box (Inside and Outside)
Introduction
This is a solo stroke that pivots the canoe with no forward or backward momentum. The turning action occurs at the pivot point of the canoe located approximately under the canoeist’s centre of gravity.
Explanation
The Inside and Outside Box Strokes are pretty much identical. The Inside Box starts with the Draw and ends with the Push Away/Pry whereas the Outside Box starts with the Push Away/Pry and ends with the Draw.
Inside
- Initiate the Box stroke with a Draw at a comfortable distance ahead of the pivot point.
- At the completion of the Draw, slice the blade aft.
- Do a Push Away/Pry. Notice that the catch for both the Draw and Pry should be equidistant from the pivot point.
- Slice the blade forward to the starting point to initiate another stroke
Outside
- Initiate the Box stroke with a Push Away/Pry at a comfortable distance ahead of the pivot point.
- At the completion of the Push Away/Pry, slice the blade aft.
- Do a Draw stroke. Notice that the catch for both the Push Away/Pry and the Draw should be equidistant from the pivot point.
- Slice the blade forward to the starting point to initiate another stroke.
Action (detect and correct)
Error: There is forward or backward movement.
Correction: Adjust the pitch of the blade. Generally, keep the blade parallel to the keel line. Ensure that forces are applied directly toward or away from the canoe rather than diagonally fore or aft. Ensure the slicing is done with no water pressure on the blade.
Error: The canoe rocks from side to side.
Correction: Avoid any lateral weight shift while slicing fore and aft. Apply force smoothly.
Error: Strokes are awkward and inefficient.
Correction: Keep the grip hand close to the upper body. Immerse the blade fully. Do the stroke slowly.
Error: The pivoting of the canoe is irregular.
Correction: Equalize the Draw and Push Away/P ry forces. Ensure that the forces are applied smoothly and at the same distance fore and aft of the pivot point. Review stroke mechanics.
“C” Stroke
Introduction
This stroke is used only by a solo paddler to prevent the bow from veering away from the paddler’s onside when getting underway or to do an inside circle. It can also be used in windy conditions to maintain a straight line.
Explanation
- Use a slight forward lean and body rotation.
- Open the wrists and extend the blade forward and out from the bow with the blade power face parallel to the keel line, facing the canoe hull.
- The shaft hand may choke up the paddle 10 to 15 cm to extend the reach.
- Draw the blade in towards the hull and then transition to a Forward stroke.
- From this point, body position and mechanics are the same as those for the J stroke: Nearly vertical paddle and fully immersed blade, unwinding of the torso and a short, quick pry as the shaft hand reaches the hip.
Action (detect and correct)
Error: The canoe veers away from the paddler’s onside.
Correction: Initiate the stroke with an effective draw towards the bow. Carve the J as close to the canoe as possible. Do a short, quick pry as the hip reaches the shaft hand. Ensure that the blade is positioned aft of the canoeist and is immersed fully. Do not over steer; end the correction phase as turning momentum begins. Sight along the bow to a landmark.
Error: During the J, the grip hand rotates so that the thumb points up.
Correction: Flex the wrist so that the thumb of the grip hand rotates forward and downward away from the body.
Error: A loss of momentum results as the paddle trails behind the paddler in an exaggerated and inefficient J stroke
Correction: Use upper body rotation ensuring that the grip hand is in front of the body and the shaft hand is at the hip. Then, with the blade positioned slightly aft of the torso, do an efficient J stroke.
Inline Sculling Draw
Introduction
The Inline Sculling Draw stroke is found within the Big Canoe Program. This stroke is performed by the bow person under forward momentum or by the stern person under reverse momentum.
Explanation
- Rotate the body and place the paddle vertically adjacent to the onside knee with hands stacked and over the water. The paddler may use a slight forward lean to extend forward to the bow.
- The blade is fully immersed in the water with the leading edge rotated so the leading edge is angled 20° to 45° depending on how much the paddler wishes to tighten the turn or arc.
- Pull the paddle to the paddler’s knee and then rotate the power face out, grip hand thumb pointed towards the paddler.
- Slice the paddle blade, in water, back out 45°, with the power face open, the grip thumb pointed towards the paddler. Like a Sculling Draw, the blade always has pressure against it.
When travelling in reverse, reverse the above description.
Action (detect and correct)
Error: Slow to turn.
Correction: Add more body rotation to extend the reach. The grip hand should be out over the water. Ensure the blade is fully immersed. Position the paddle in a more vertical position and forward. Open up the angle more.
Far Out Forward
Introduction
The Far Out Forward stroke is found within the Big Canoe Program. It is performed when carving a turn with an outside tilt. This stroke is referred to as the “midsection” of a Forward Sweep.
Explanation
- Place the grip hand firmly on the grip and slide the shaft hand 10 to 15 cm up the shaft to extend the reach (aka “choke up”).
- With the paddle nearly horizontal, grip hand thumb up at chest level, fully immerse the vertical blade as far as possible while still maintaining power when paddling forward (knee to the hip).
- Lift the blade up out of the water to return and repeat the stroke.
Action (detect and correct)
Error: Canoe slows down on the turn.
Correction: Fully immerse the blade. Eliminate the pitch of the blade to keep it vertical. Reach out a little farther.
Last updated: April 11, 2026
Published: January 26, 2026